Sustainable WebDesign: Image optimization using new image formats
This blogpost is also available in German.
In February 2015, I had already written blogposts on the topic of “image optimization” here. There are now seven years between then and now. A long time in IT. Time for something new, time for new image formats.
In the meantime, there are two new image formats that are more or less well supported by current web browsers: WEBP (from Google) and AVIF (from the Alliance for Open Media).
New image formats also mean new image compression algorithms and thus smaller image file sizes with very little to no loss of quality.
To show a concrete example of potential savings for my private photoblog (https://blog.lichttraeumer.de):
In the yearly subfolders of my WordPress upload folder there are 164,323 images that have accumulated there since 2011. Thereby (currently still) every image is on the SSD disk in triplicate: as JPG, WEBP and AVIF. I’ll talk about the sense or nonsense later.
With the following search queries via SSH on the shell of my root server I have determined the occupied SSD disk space per image format:
find ./20** -name '*.jpg' -type f -exec du -mch {} + | grep total$ | cut -f1 | awk '{ total += $1 }; END { print total }'
3123
find ./20** -name '*.webp' -type f -exec du -mch {} + | grep total$ | cut -f1 | awk '{ total += $1 }; END { print total }'
2292.5
find ./20** -name '*.avif' -type f -exec du -mch {} + | grep total$ | cut -f1 | awk '{ total += $1 }; END { print total }'
842
Extracted from the shell commands this means:
- 3.1 GB space consumption for JPG images (optimized for web via Adobe Photoshop and Optimus)
- 2.3 GB space consumption for WEBP images (created via Optimus)
- 0.8 GB space consumption for AVIF
This means, if I would offer my images exclusively in AVIF format, I could theoretically save 2.3 GB (or 75 percent) of SSD disk space and – depending on the number of images per blogpost – also a lot of data transfer. Using only WEBP images, I could practically save just under a GB or (25 percent) of SSD disk space.
Speaking of data transfer: in the last few months, my photoblog had an average data transfer of 1.2 GB of JPG images transferred to my visitors per month.
Unfortunately, the calculated savings of 75 percent (i.e. 900MB) – when delivering AVIF instead of JPG – could not simply be deducted.
The reason: not all browsers and versions yet support, at the time of writing this blog post, the new AVIF image format. See here at Can I use.
Browser support for the AVIF format is currently around 80 – 83%. Therefore, if AVIF images were stringently delivered, I would be able to mathematically and on average save about 720 – 750 MB of data transfer per month.
In the further course of this blog post I would like to limit myself to the AFIV image format.
How can AFIV images be generated in general, how do I generate AVIF images and how does my web server deliver them?
For this I would like to show three possible solutions:
- Bulk generation of avif images using “libavif” on the Linux shell
- Using the app “AVIF Converter” on MacOS in the Pro version
- Adjustments in the Nginx webserver for WEBP and AVIF image format
- Using the WordPress plugin “Converter for Media” in the Pro version.
1. Bulk generation of avif images using “libavif” on Linux shell
You will agree that converting a jpeg image repository that has grown for years cries out for automation, especially since WordPress and WordPress themes provide images uploaded to the media library in different image dimensions. Depending on the theme, one uploaded image quickly becomes up to ten additional images (e.g. with the Enfold theme by Kriesi).
In my case there were several thousand images in the WordPress upload directory, so I wanted as little work as possible with the conversion. So I chose the combination of a shell script and libavif. And yes, it was a little bit of “fiddling” until I had compiled the whole thing to a working binary.
To create avif from jpg and png images with libavif, I use the following “quick and dirty” shell script.
#!/bin/sh

# Variables

SOURCE_PATHS="/var/www/htdocs/blog.lichttraeumer.de/wp-content/uploads/"
AVIF="/usr/src/libavif/build/avifenc"
WWW_USER="www-data"
WWW_GROUP="www-data"


#### Do not edit below ####
# PNG to AVIF
find ${SOURCE_PATHS}  -type f -name '*.png' | while read line;do
        F_IN=$line;
        F_OUT="$line".avif
        ${AVIF}  --codec aom --yuv 444 --min 20 --max 60  $F_IN $F_OUT;
        #${AVIF}  --min 0 --max 63 -a end-usage=q -a cq-level=18 -a tune=ssim  $F_IN $F_OUT;
        chown ${WWW_USER}:${WWW_GROUP} $F_OUT
done

# JPG to AVIF
find ${SOURCE_PATHS}  -type f -name '*.jpg' | while read line;do
        F_IN=$line;
        F_OUT="$line".avif
        ${AVIF}  --codec aom --yuv 444 --min 20 --max 60  $F_IN $F_OUT;
        #${AVIF}  --min 0 --max 63 -a end-usage=q -a cq-level=18 -a tune=ssim  $F_IN $F_OUT;
        chown ${WWW_USER}:${WWW_GROUP} $F_OUT
done
The script now cycles through the WordPress upload folder (and its subfolders) and converts all JPG and PNG images to AFIV format.
2. Generation of AVIF images using the AVIF Converter App
Since the Adobe Photoshop plugin for generating AVIF images is currently only available for Windows, I decided to use the AVIF Converter app (for a one-time fee of € 5.99). The app offers various settings to generate AVIF images. Except for the “AVIF-Quality” and the “Chroma-Subsampling” the app runs in the default settings for me. In the following example image you can see that in terms of file size 88% can be saved without the image quality suffering.
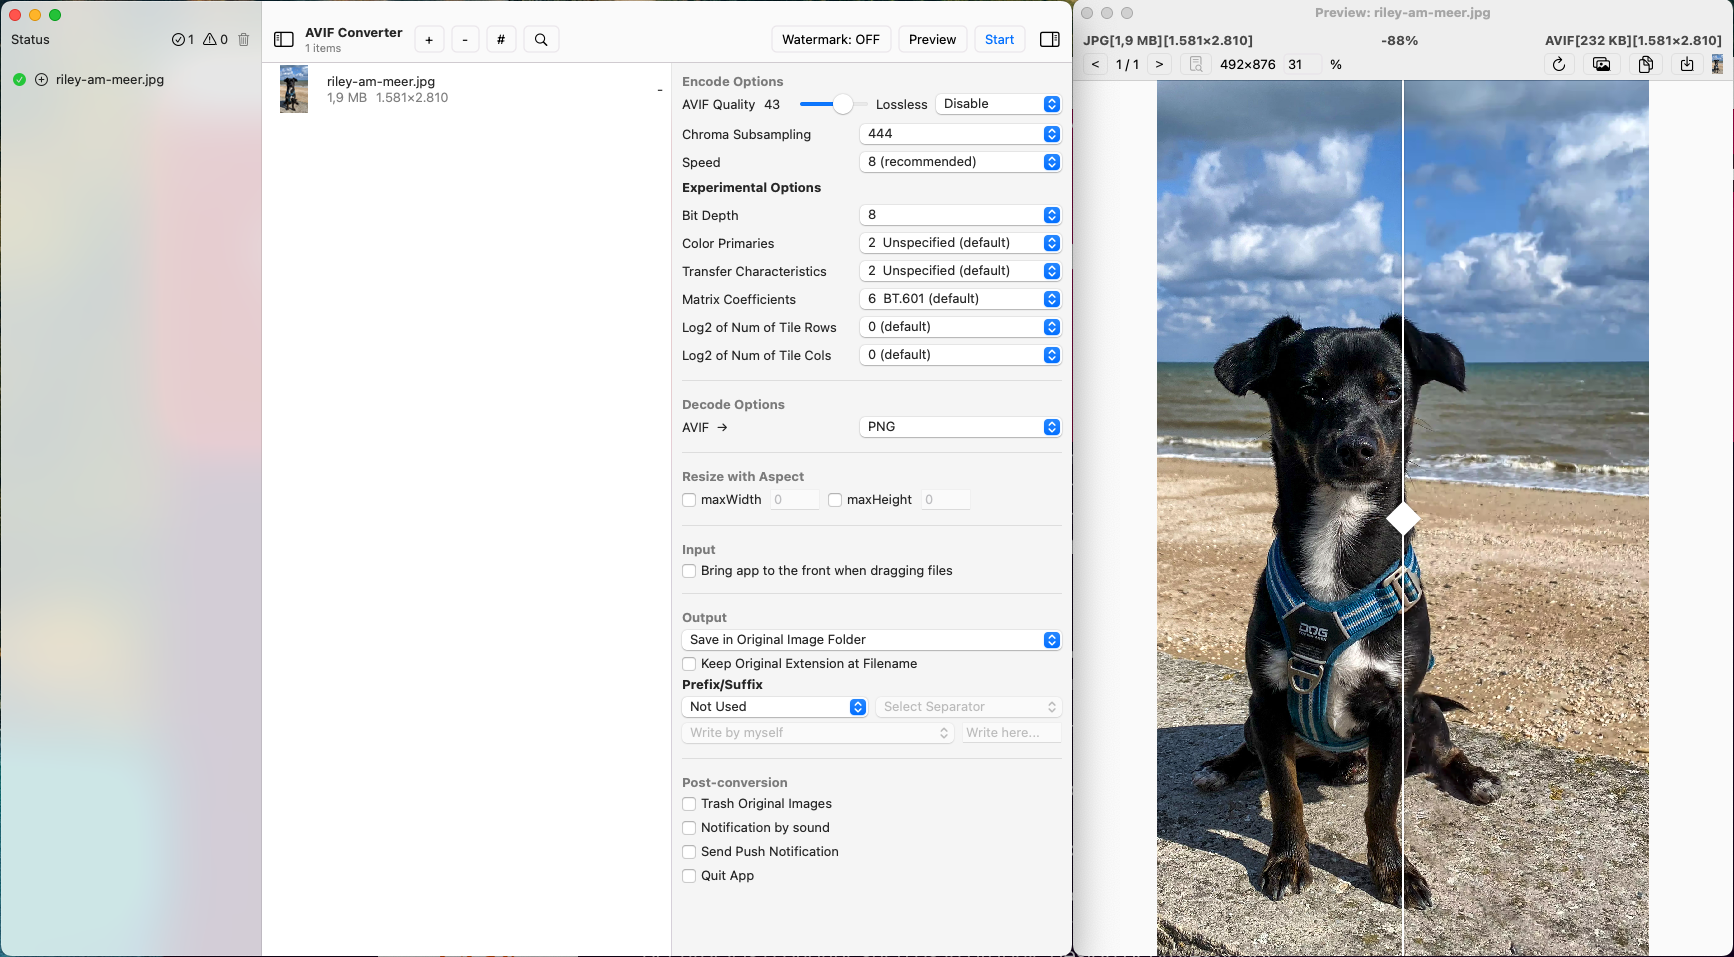
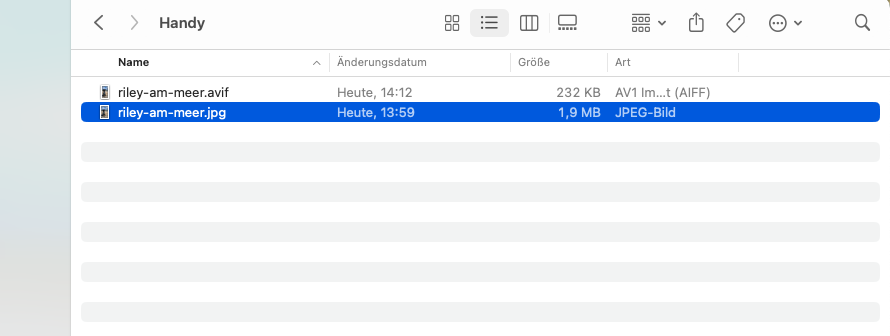
Here the direct comparison: On the left the picture of our dog at the sea as JPEG and on the right as AVIF


Hand on heart: do you see a significant quality difference on your screen that sustainably represents why JPEG should be “better” than AVIF?
To be able to upload your local AFIV images directly to the WordPress media library, I added the following code to my functions.php:
/* Allow AFIV Uploads */
add_filter( 'wp_check_filetype_and_ext', 'wp_enable_avif_1', 10, 4 );
function wp_enable_avif_1( $types, $file, $filename, $mimes ) {
     if ( false !== strpos( $filename, '.avif' ) ) {
         $types['ext'] = 'avif';
         $types['type'] = 'image/avif';
     }

     return $types;
 }


 add_filter( 'upload_mimes', 'wp_enable_avif_2' );
 function wp_enable_avif_2( $mimes ) {
     $mimes['avif'] = 'image/avif';

   return $mimes;
 }
3. Adjustments in Nginx web server for WEBP and AVIF image format
A Nginx (and also an Apache) web server usually does not know what to do with images in WEBP or AFIV image format. Therefore the following adjustments are necessary for the NGINX web server.
Add the following lines to the mime.types file of your Nginx server:

   image/webp                                       webp;
   image/avif                                       avif;
   image/avif-sequence                              avifs;
With this you have made the two image formats and the corresponding suffixes “known” in Nginx. With the following lines in your vhost configuration you make your Nginx server deliver WEBP or AVIF images, depending on what the accessing browser supports:
## Set Image Suffix for WebP and AVIF
        set $img_suffix "";
        if ($http_accept ~* "webp") {
                set $img_suffix ".webp";
        }
        if ($http_accept ~* "avif") {
                set $img_suffix ".avif";
        }

# Serve AVIF or WebP instead of JPG
        location ~ \.(jpg|png)$ {
                add_header Vary "Accept-Encoding";
                #add_header X-debug-message "Serve modern images formats $uri$img_suffix" always;
                expires 365d;
                log_not_found   off;
                access_log      off;
                try_files $uri$img_suffix $uri $uri/ =404;
    }
4. use of the WordPress plugin “Converter for Media
It is valuable if all the manual work is too much for you, or you don’t have access to the files described above at your WebHoster.
As so often, a WordPress plugin offers itself as a solution. I decided to use the Pro version of “Converter for Media“, because the conversion to AVIF image format is only offered in the Pro version.
In the spirit of a sustainable digital supply chain, I prefer WordPress plugin developers and companies that are based in the EU, and whose computing capacities are powered by sustainably produced electricity. The Converter for Media plugin is developed by a company “mattplugins.com” which, if I have researched correctly, is based in Romania. The servers on which images are converted to WEBP and AVIF image format are located in a Hetzner data center in Finland, which like all Hetzner data centers is powered by renewable electricity.
Using this plugin makes it very easy for you to use the new image formats and by converting your images on the external servers at Hetzer in Finland, you are also independent of the technical requirements of your WebHoster.
Considering the savings of the manual doings described above, I find the pricing of the plugin to be reasonable.
Image optimization using new image formats – Conclusio
About the sense or nonsense of having multiple image formats (JPG, WEBP, AVIF) on your webspace: In my opinion it is “OK” to have several image formats for one image on your webspace, because images are delivered to many of your visitors. So the benefit-scissors “(energy) costs” of webspace versus saving of data transfer goes up the more for it, the more visitors / traffic you have on your website.
Yes, this is not ideal, because the size of your webspace backups and therefore the duration and energy consumption of your backup increases of course. Maybe I / will find a solution for this in the future.
As you can see, there are many – in my opinion quite simple – ways to optimize your images, which lead to the goal and contribute to the idea of a sustainable web design.
Not only do you save data transfer, and thus CO2, from your web space / web server over the Internet to your customers; your web pages are also delivered faster by saving data transfer rates. This benefits your visitors, especially on mobile devices with slow networks, and also ensures a better Google ranking; so a win win situation.
As you can see here, even a blogpost with a lot of images can achieve an almost maximum score (99 out of 100) on Ecograder!
One topic I didn’t go into is the topic of CDN. Many CDN providers also have image conversion to new image formats in their portfolio. However, using a CDN and taking advantage of these possibilities only makes sense if you have to serve an international clientele.
In order to integrate CDN assets into your website in terms of sustainability, you should definitely research the extent to which the CDN provider of your choice is committed to global sustainability goals.
As a good example for the possibility to use AVIF images and to act sustainably I would like to mention Cloudflare. You can read Cloudflare’s “Sustainability Report” here starting on page 30.