A option for CO2 emission assessment of your website
Basic information
The CO2 emissions caused by your website belong to the so-called “Scope 3 emissions” according to the GHG (Greenhouse Gas Protocol).
Scope 3″ includes all categories of indirect greenhouse gas emissions from sources that a reporting company does not own or directly control. For reporting under the GHG Protocol, accounting for Scope 3 emissions is (still) optional.
So what does this have to do with your website?
Good question, but easy to answer: calling up your website, surfing it produces CO2 emissions (among other things) on the end devices of your visitors. Depending on how efficiently your website was created (or not) and especially how many hits / visitors you have over a time unit, these CO2 emissions vary. Furthermore, your site must run on a web server, the operation of which – unless you operate your own data center or have rented a co-location – also means Scope 3 emissions for you.
© 2023 by Martin Wolfert
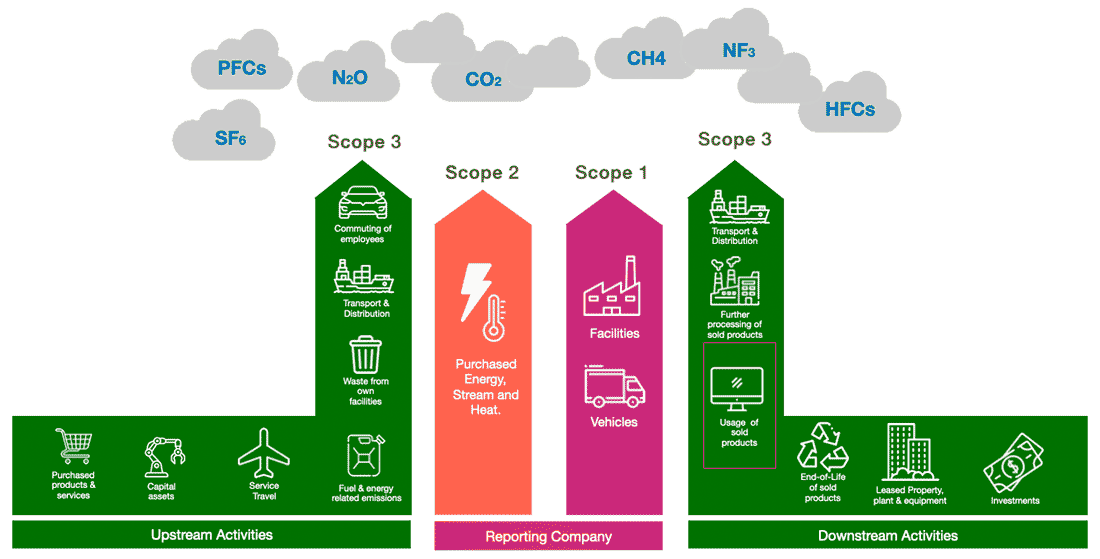
This chart shows you some Scope 1 /2 and 3 emissions. This blogpost is exclusively about Scope 3 downstream costs ..
The “correct” capture of Scope 3 emissions is anything but trivial
This also applies to the capture of CO2 emissions from your website, which can be located in the above diagram on the right as “Scope 3-Downstream Activities”. This applies 100% if your website is hosted by a web hoster or co-located, and partially (about 63%) if your website is hosted in your own data center.
To bring some light into the darkness I would like to list which so called “System Boundaries” are involved until your website can be delivered to your customers. The list does not claim to be complete:
- Your website needs to be programmed, even if you use a CMS like WordPress
- This generatesCO2 emissions when programming WordPress core, plugin and theme code
- This generatesCO2 emissions when hosting WordPress sources on wordpress.org
- The generatedCO2 emissions when hosting plugins and themes for example on Themeforest
- Your website must also be hosted somewhere
- Your webhoster has to run his datacenter with electricity, cooling and employees
- The servers, switches, routers and cables purchased by your web host have to be built somewhere and delivered to your host; this generates CO2 emissions
- The web server and database your website runs on consumes electricity; this generates CO2 emissions.
- When delivering your website (from the web server to your customers) CO2 emissions are generated by the use of “the internet” with its cables, switches and routers (which in turn run in data centers).
- Here you don’t know if everywhere “green” electricity is used for operation.
- When your website arrives at your visitors’ devices and is rendered / displayed, this generates CO2 emissions.
- The wifi router, the PC, the laptop, the tablet, the cell phone of your customers need electricity, of which you do not know how “green” it is; this generates CO2 emissions.
- Depending on age, CPU generation, number of CPU’s, amount of memory used, SSD or HDD usage, screen size, number of browser windows and tabs opened, etc., a device produces different amounts of CO2 emissions through power consumption.
- Mobile surfing (outside of a wlan) requires radio masts to be built and operated by your network operator. This also generates CO2 emissions
- The CO2 emissions are highest for mobile connections, followed by DSL and fiber-optic lines.
As you can see, there are a lot of unknown variables involved.
The great thing about “IT” and the operation of websites is that the systems usually scale easily with the number of visitors. However, the other side of the same coin is: the resulting CO2 emissions unfortunately also scale with the number of visitors! That’s less nice.
If you are now rightly asking yourself, “How can I accurately measure CO2 emissions from my website?”, then I can give you the following, simple answer:
“You can’t!“
The good news is that there are tools you can use to calculate and monitor CO2 emissions. But beware: the resulting data are not absolute numbers, but “only” well-calculated approximations as of today!
One of these tools, and how it helps you in terms of data collection and monitoring, I would like to introduce to you in the following: Sitespeed.io
Sitespeed.io as an opportunity to capture CO2 emissions
I use Sitespeed.io myself to monitor CO2 emissions of my own and client websites. Sitespeed.io is a Node.js application based on the CO2.js framework of the Green Web Foundation.
The creators of Sitespeed.io offer the tool out-of-the-box as a Docker container. Alternatively, you can install Sitespeed.io “by hand” in good old Linux admin fashion, which was my preferred way.
So now “my” Sitespeed.io instance is running on a cloud server at Hetzner and consists of the following components:
- Sitespeed.io as Node.js application
- InfluxDB as database
- Grafana as graphical frontend
- The whole thing runs behind a Nginx reverse proxy, because I didn’t want to let Grafana run completely “naked” on the net
Practically it looks like that on my virtual CloudServer:
- Under /opt/sitespeed/bin/ the bash scripts for each domain to be captured are stored.
- In /opt/sitespeed/sitespeed-results/ the “HTML-results”, the images and videos of the captured domain are stored
- Under /var/lib/influxdb/data/ the data of the InfluxDB are stored.
- The bash scripts are called under the user “sitespeedio” in his crontab every 24 hours.
Sitespeed is very well documented in my opinion! You can find all configuration options of Sitespeed here. You can reach the GitRepo with this url: https://github.com/sitespeedio/sitespeed.io
Visualization of collected CO2 emissions via Grafana
The Grafana board presented below should be seen as a suggestion of a visualization and can be downloaded as JSON here.
The board fully covers my current usecases. Feel free to contribute via Git, or we can exchange ideas via a virtual meeting. Just write me a mail, or contact me.
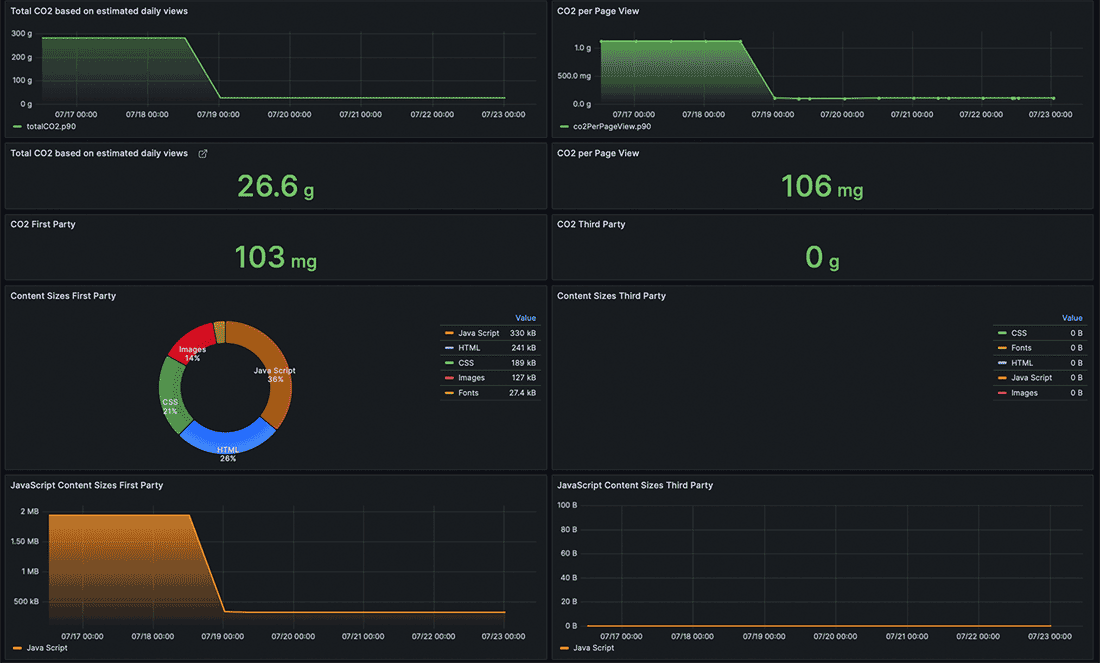
Here you can find numbers that were only gathered for one start page (from top left to bottom right)
- “Total CO2 based on estimated daily views” – over the time period you have set in Grafana.
- “CO2 per (single) Page View” – over the period you have set in Grafana
- “Total CO2 based on estimated daily views” – value of the last measurement
- “CO2 per Page View” – value of the last measurement
- “CO2 First Party” – value of the last measurement according to the domain
- “CO2 Third Party” – value of the last measurement different to the domain
- “JavaScript Content Sizes First Party” – data transfer size for JavaScript files matching the domain, over the period you have set in Grafana
- “JavaScript Content Sizes Third Party” – data transfer size for JavaScript files different from the domain, over the time period you have set in Grafana

Here you can find the numbers for all pages and posts of a WordPress site (from top to bottom)
- Table of individual pages and contributions of the last measurement
- Time of the measurement
- Page viewed / post viewed
- Value of the last measurement in grams (per pageview)
- Timeseries of measurements per page / post over the period you have set in Grafana
- Display of last measurement values “Load” as median
- Display of the measurement values “Max” and “Min
CO2 optimization of your WordPress page
As an exception, a little self-promotion on my blog:
I’m happy to audit your WordPress page for potential savings in terms of CO2 emissions or include your WordPress page in my Sitespeed.io monitoring. Click here to see what I have to offer in detail for you and the carbon footprint of your WordPress page.
CO2 long-term emission monitoring with Sitespeed.io
If you keep the data collected by Sitespeed over a long period of time, then you can very well incorporate the visualization in Grafana into a sustainability or CO2 emissions report. Ideally, the practical implementations to reduce the CO2 emissions of your website are recorded in writing with date and technical details e.g. in Jira or Excel in such a way that they match the visualized improvements on the date axis.
With this you can then safely prove what was implemented when and what savings were achieved.
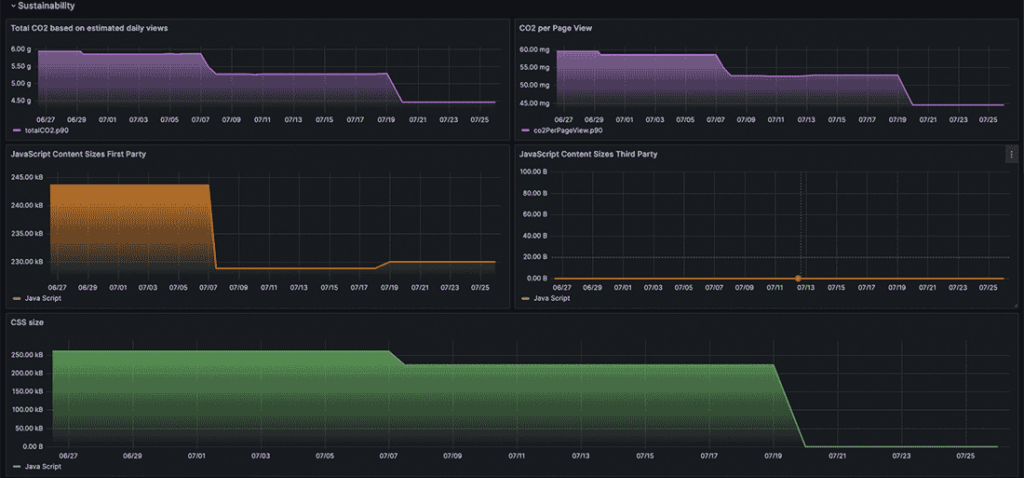
As an example, here is a screenshot that visually shows the improvements on wp-loft.com over the last 30 days. Very clearly you can see the dropping line between 07/19/2023 and 07/20/2023, because on 07/19/2023 I took care again excessively with the reduction of the assets to be loaded on de start page.
So how do you arrive at a “Carbon Footprint” of your website?
An impulse to do so, respecting the following conditions, would be:
- You are in possession of the access figures for each page and each contribution of your website over a longer period of time (e.g. for the year for which you create your sustainability report).
- This data is available in a machine-readable format, e.g. as a CSV file
- The sitespeed survey data (from InfluxDB) over a longer period of time (e.g. for the year for which you create your sustainability report) is available in a machine-readable format, e.g. as CSV.
Export of CO2 emission data
An export of the CO2 measurement data collected by Sitespeedio can be done either via Grafana, or directly via database query. I have used a database export for this blogpost.
A small but in my opinion important tip: when exporting CSV data from InfluxDB, make sure to use the option “-precision ‘rfc3339′”. This way the Unix timestamp of the InfluxDB will be exported to the CSV file in a readable date format.
Example: “influx -precision ‘rfc3339’ -database databasename -execute “SELECT * FROM totalCO2,co2FirstParty,co2PerPageView,co2ThirdParty” -format csv > test-export.csv”
A first, simple possibility would be to import both CSV files into Excel, group them on a daily or monthly basis, and then multiply the corresponding access figures (per page/post/URL) with the corresponding CO2 measurement values.
If you have additional information about the ratio between new and returning visitors, then you can calculate a factor from this, and include it in the calculation of CO2 emissions.
At this point I have to be honest: I do not have a “calculation patent recipe” for a good calculation of the CO2 emissions balance of a website, as of today. Therefore, the impulses in this blogpost are certainly not THE solution. But my impulses can be the beginning of an iterative process that gets a little bit better with each run and after each active exchange with your network.
I would be very happy to exchange and discuss with you, especially on the topic of “merging different data sources as correctly as possible”, in order to put the results up for public discussion somewhere afterwards.
I hope you can generate added value for yourself from this blog post, so that you can reduce the CO2 emissions of your website and make the world a little bit better than it was yesterday.
Making digital greener. One byte at a time.